Showing posts with label Crafts. Show all posts

4.28.2015

DIY: Canvas Posters


Hey Y'all!

I am not a crafty person, but I decided to try and make something this past weekend.  And it turned out great!  Point of story; if I can do it, you can do it.  Trust me.  And so you CAN do it, I trial and erred and looked up online and complied this beautiful DIY tutorial for you.  You're welcome. XD


First off, you need some canvases.
I got mine at Hobby Lobby (For the record, I could die a happy person in that store.  It is my interior designers' dream. Ahhh...I could (and may or may not have...) empty my entire bank account in there.


I got a 4-pack of pretty small squares, two bigger rectangles, and two big rectangles.  What size you use isn't really important.  Whatever you want.

I also got a big huge packet of scrapbook paper.  I'm talking like, 120 sheets or something.  But if you or your mom or someone scrapbooked, just try and find a couple old sheet laying around. 


You will need a black sponge brush, like so:


Scissors:
 

And some Mod Podge.  Which, we didn't have any of and to be honest I didn't even know what it was.  But I found out via internet that if you mix equal parts of water and Elmer's glue in a jar and shake it all up, it works just as well as Mod Podge!

Yes, that is a old salsa jar.  It's called upcycling. XD
Now, I put words on my posters.  You can leave them with just the paper, or add words.  I went on PicMonkey, used the DESIGN to type a quote in fancy script, and printed it.  We will come back to the words later.


1} First step in every craft is, of course, to cover your workspace with newspaper.


2} Line the scrapbook paper up to the edges of your canvas and use the scissors to cut the shape of the canvas out.  Make sure it lines up; although it is more than fine to leave a little hanging over and just trim the edges later.


3} Remove the paper and use your sponge to apply several layers of Mod Podge to the canvas.


4} Line one corner and edge of the paper, then smooth from the middle, making sure the paper is flat, smooth, and lined up.  This is the trickiest part.


Afterwards you may have to go back and add a little more Mod Podge to the edges to make the corners stick down. (You can see how the bottom right corner is sticking up a little.)


5} Let your canvas dry, but every once in a while go back and smooth them out again; bubbles manage to sneak in.  Meanwhile...

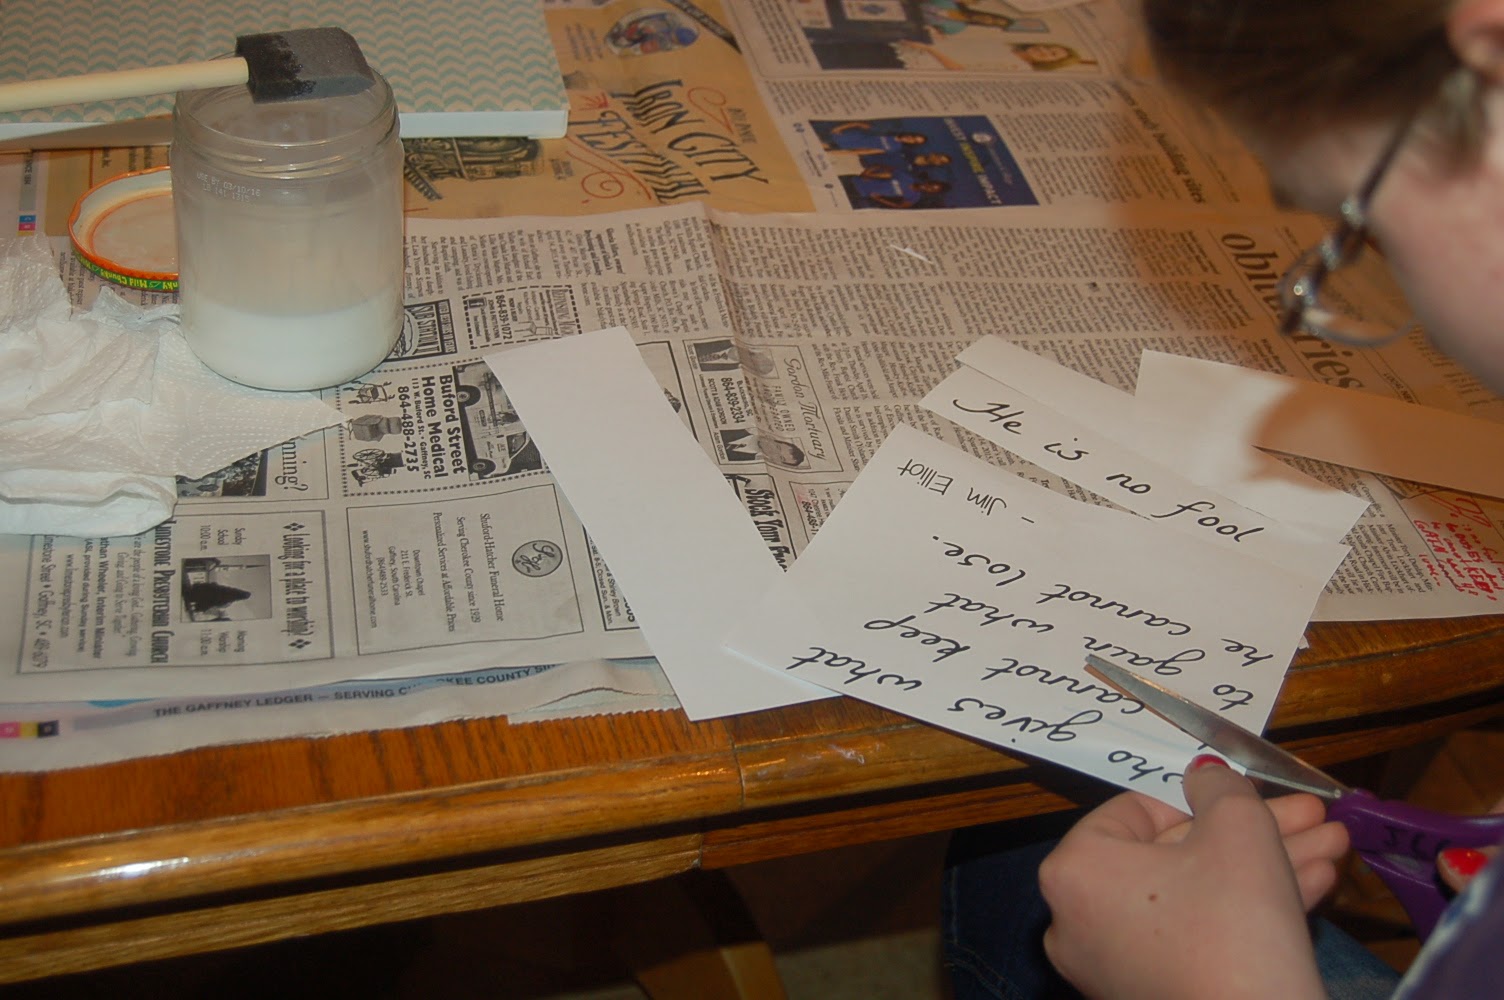
Take your printed out words and cut them out, close as you can.


6} After the canvas has dried lay the cut out words on it to get a feel for where you want them to be:


7} Take the words off one at a time, using the sponge to cover the backs of them in Mod Podge, and to put Mod Podge on the canvas where the words will go.


Then wipe Mod Podge over the top to seal them in.

8}  Smooth all the words out, and let dry!

And there you have it!  Isn't that beautiful?  I loved how these came out; I did about 6 of them.  What I love about doing these homemade is that you can chose your own background, text, font, size, etc, and it is cheaper than buying them!  Plus, there is an incredible amount of satisfaction in knowing you made something yourself.

Did you like this project?
Would you like to see more tutorials or DIYs?

~Jess

10.12.2014

Updates // DIY Painted Pumpkins // Ramblings

Hey peeps.

   Okay, seriously people, I owe you the biggest apology.  I'm behind in everything.  Posting, updating, the PINK Celebration/Challenge, it has just fallen apart.  While I will note that my mom has been down for 2+ weeks, and I'm trying to put some overtime into school, and I'm handling the household stuff, and we have been super busy, I've also wasted a lot of time.  Doing...nothing.  So, anyway, I think I apologize way more on here than I should, but I do want you to know that I am sorry.  So, to show my gratitude for ya'll, I'm going to....ramble!  Yah!    \(^-^)/  ;)

  Well, for two Fridays in a row now, we have left the house about 9:00am and come home about 8:30pm.  Can you guess how much school I got done? ;)  We had art class, then lunch, then library, then a chiropractor appointment for my mom, the a store, then a birthday party, then a one and a half hour drive home.  When I got home I talked to two of my very good friends!  First, a girl who choose to remain anonymous sense I'm not supposed to tell that she talked to me ;)  She hasn't talked on the phone in literally years.  But, after knowing her for a year, I finally heard her voice.  Her sweet wonderful voice.  It was adorable.  After that I talked to a beautiful, familiar voice of my very best friend.  I had called and left a voice mail to her the day before in tears, and so she spend all of Friday trying to get ahold of me.  I love her so much. <3  Ah, so very very much.  Both of my peeps.  My friends.  My crutches and the people who have to put up with me the most.  Virtually, none the less.  I'm surprised they haven't thrown me off a cliff yet. ;)

  At the party they were carving pumpkins, and there was one extra so the older sister and me carved one.  We just did the normal jack o' latern.  We did a double sided one; she did one side, I did the other.  =D

Her side.  Beautiful =D ;)


My very first (that I can remember at this moment) carved pumpkin.

  So, this past Friday, we went to Trader Joe's.  Okay, this place.  Seriously.  I love Trader Joe's. It's...amazing.  Awesome.  Adorable.  I know I'm not the only one who loves Trader Joe's, please refer to Ella's post HERE!! So, yeah, I basically love Trader Joe's.  And on Ella's post, if you look in the picture you can see where the package says "Trader Joe contemplates Inner Peas."  Puns.  Everywhere.  They're awesome.  And then my mom found THESE:

DUDE......THESE THINGS!!!

Anyway...

Remember how I said that I wanted to decorate pumpkins?  Well, I'd been on the lookout for some, but hadn't found any.  Well, I found these ADORABLE mini pumpkins at TJ's.  So so cute, and so so what I wanted.  Perfect.  So, I had a photo shoot with my pumpkins.  See below ;)

Aren't they the cutest?

It looks yellow in this picture, but trust me, this is the PERFECT little pumpkin.  As you'll see later, I didn't even decorate this one.  The color, the size, the stem.  Ahh...

This is the biggest one, and only slightly bigger than my palm.


Ignore the shadows around the picture =P

This is my personal favorite picture =)

Julia staged this.  She is a magician. ;)


Well, so now come the DYI part. ;)  I didn't have the shades of paint I wanted, so I ended up using nail polish!  It worked awesome!

So, I started by covering my white pumpkin in some creamy-almost clear polish.  I wanted to bring out the white color; make it more pure, without the crystal-white from just white polish.

My workstation.  Ignore the high school football players head, I didn't realize how evident in these photos it was until I uploaded them lol XD


I did use a paint brush for this, but then the paintbrush started hardening, but sense it is my sisters, I didn't want to ruin it, so I switched later.

See how it's glossier?


The end result.  Isn't it gorgeous?

  Next pumpkin I did was Polka Dots! <3


Pretty self-explanatory lol


And then I took my biggest one and tried to make it look realistic, but more colorful.  I realize now I didn't take much pictures of this one, I missed a step. lol

I drew with a nail marker down the lines to bring out the orange =)

Then I put clear nail polish on it to bring out the gloss.  You can also see in this picture where I put green sparkley glitter polish on the stem.


Here you can see the orange lines. =)

 And...I went a little crazy with the last one....


So now please enjoy photo shoot #2 with the painted pumpkins! lol


Ahhh....Well, that's about it I suppose.  This was a super long post, I'm very sorry.  Thank you all so much for sticking with me and this blog though our not-so-good times.  I can't promise that I'll be improving with my posting, but I'll try.  Thank you Abigail for doing the PINK Challenge!  You are my hero! =D <3

Well, toodles.  Love ya.

~jess

ps.  The Q&A video.  Thankfully for you all a friend sent me a message over Goodreads, like, "Hey, how's the video coming?"  And my jaw hit the floor. Guess who c-o-m-p-l-e-t-e-l-y  forgot!  So, I'm going to film that.  Like, tonight.